|
Introduction:
Now that the planning phase has been completed it’s time to put the plan into action! But before you start sowing seeds and sitting back to watch for the turkeys and deer to arrive, it’s important to build a strong foundation for your food plot. It’s important to test the soil, clear away unwanted vegetation, prepare a good seed bed and choose the right seed to meet the objectives you set in the planning phase.
Soil Test:
If I could point to one thing that causes more food plot failures or food plots of limited success it’s not amending the soil with the proper nutrients prior to planting. How do you know how much lime and fertilizer is required? You need to take a soil test and have the soil analyzed. Based on the information that is sent back to you and the size of your plot you will be able to calculate how much lime, nitrogen, phosphorous, and potassium you will need for the specific type of plant you will be planting.
Soil tests are inexpensive and easy to complete. Test kits are available from local county agricultural extension agents, seed manufacturers, or private testing labs. Follow the instructions on the package for taking a sample, fill out the form that asks a few questions about what you will be planting, and mail in the sample in the envelope provided. When the results come back you will have the requirements for lime and fertilizer for your plot. Follow these recommendations and you will be giving your plot the best chance for success. If you are unfamiliar with how to read the results take your analysis to a fertilizer sales outlet and ask them to help determine the specific type of fertilizer you need.
Measuring the Plot:
How much lime and fertilizer do I need to buy? Now that the soil sample has been returned and you have an idea of how much lime and fertilizer will be required on a per acre basis you need to determine how big your plot is. This can be accomplished with a range finder, tape measure or measuring wheel. Calculate the dimensions and use the sheet below for determining the size of your food plot.
Calculate Your Plot Size
Correct the pH:
With the results of the soil test and knowing the size of your food plot you can purchase the lime that will be required to bring the pH to optimal for the type of plant you have selected. If it has been a number of years since this soil has been used for agricultural purposes don’t be surprised if the amount of lime recommended is large. You might think this is a place to cut corners and save some money but having the correct pH allows the plants to take advantage of the fertilizer you apply and will also help with reducing competition from weeds.
Lime can be applied as either pellet like granules or agricultural lime that is almost like a powder. The cost of the pellet lime is generally higher than the agricultural lime but it is often more convenient to use. If your plot is small or difficult to access with a spreader truck, then the pellet lime will be your best alternative. If you are planting a feed plot, something bigger than ½ to one acre in size, then agricultural lime is the cheapest option. Agricultural lime can be purchased from a private contractor that will spread it on your food plot with a spreader truck or it can be delivered in bulk if you have a tractor and drop spreader available to do the spreading yourself.
Once the lime is spread you should wait a couple of months for it to penetrate the ground and begin acting on the soil. Lime takes time to seep into the ground and react with the soil, so planning for it prior to planting is critical. By completing the soil test as soon as possible and amending the soil prior to planting seed, your food plot will have a greater chance for success. Remember the best time to amend the pH is BEFORE you plant your seed.
Clearing Existing Vegetation:
This step could possibly be the most difficult step if you are clearing an area in your forest for a new food plot. After much thought and planning if you determine the best location for your food plot is where a number of large trees are currently growing then having heavy equipment like a bull dozer will be necessary to remove stumps and roots prior to amending the soil and preparing the seed bed. If this is the case you may want to consider planning for the food plot when embarking on a timber sale. The logger you hire will be able to remove most of the trees for you and may be able to remove the roots and stumps too. If this is the plan then even more consideration should be made for stand location since the stumps could be used to funnel deer movement closer to a hunting stand.
Hopefully your chosen location won’t require chain saws and bull dozers to clear existing vegetation. If that’s the case then your primary concern should be to kill the existing vegetation so that it won’t compete with your new food plot. It is important to kill as much of the existing vegetation as possible or else your food plot will have trouble getting established and soon will be choked out by weeds.
An effective herbicide for killing existing vegetation is glyphosphate or what is commonly known as Round-Up. This is a general herbicide that will kill almost any weed prior to creating your food plot. It is easy to work with and does not require a pesticide license to purchase. It can be purchased in a concentrated formula that is combined with water prior to spraying. Follow the directions closely and make sure you know what types of weeds you are trying to kill prior to spraying. Depending on the specific weed depends on the percentage of glyphosphate needed to eliminate it.
Depending on the time of year and how much growth has occurred it may be necessary to mow the existing vegetation prior to spraying. If mowing is needed I usually wait a week or two after mowing before I spray. Glyphosphate works best on contact of actively growing plants and won’t be as effective if applied immediately after mowing. I sometimes combine glyphosphate with another herbicide, 2-4-D. This combination makes for an effective kill of a wide variety of weeds.
Upon the initial application of herbicide I usually wait a week to determine if my spraying was effective and if I missed any areas. If I notice a spot that was missed I will go back and reapply herbicide. After the second week the plot is usually showing signs of a complete kill. But if it isn’t I will go back and reapply herbicide a second time. Sometimes there will be a weed that I may not have seen in the plot that didn’t get killed off with a high enough percentage of glyphosphate. Rather than ignore the problem I’ve found it’s better to take the time now to kill as many weeds as possible. If anything remains it will usually produce enough seed and find the conditions favorable enough to compete with your desired plants. The best time for controlling weeds is BEFORE you plant.
Even after making your best attempt at killing existing vegetation it is still important to remember that there are weed seeds banked in the soil. Some seed can survive for many years just waiting for the right conditions to be present before germinating. You may be unknowingly creating those perfect conditions by disturbing the soil as you prepare to plant your food plot. I mention this because you may see weeds develop even after you have made your best effort to eliminate them. If you follow the steps we’ve outlined to this point your plot will be positioned to be successful and subsequent weeds will need to be controlled during the maintenance phase.
Below is a series of pictures illustrating the process of clearing existing vegetation.
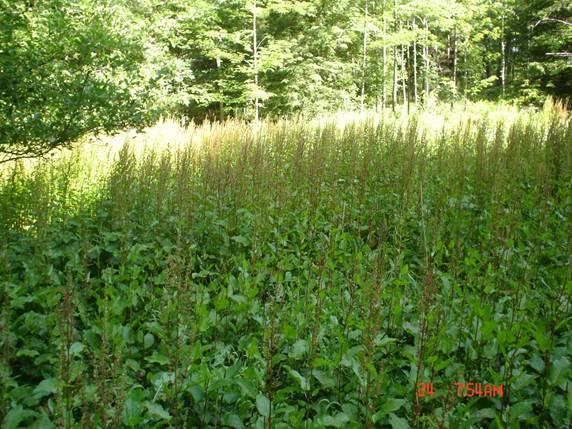
Site prior to clearing existing vegetation.
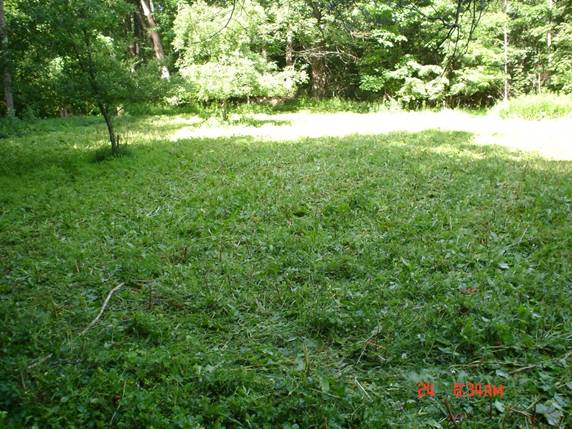
Same site after mowing.
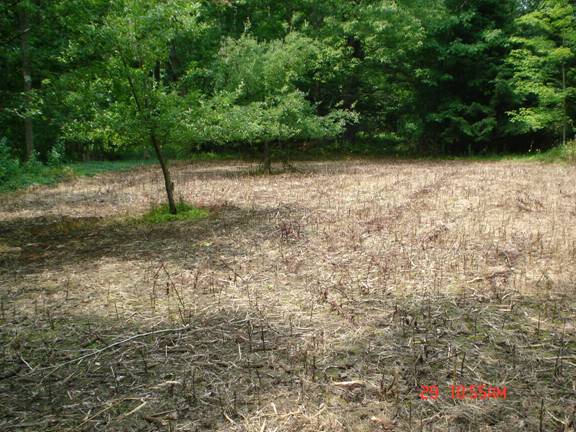
Site one month later after two applications of glyphosphate. Notice green areas around fruit trees and fruit trees themselves were not affected by the herbicide.
Preparing the Seed Bed:
Once the existing vegetation has been killed off the next step is to create a condition for good seed to soil contact or what is known as the seed bed. Depending on the size of the plot and the tools you have available,
this could be as simple scratching the ground with a garden rake to using a tractor with a multi-bottom plow and disk unit. If the plot is relatively small, ¼ acre or less, a garden roto-tiller can be an effective tool for creating a seed bed and one that most people have access to. For large multi-acre food plots more traditional farming equipment will be needed. A larger tractor, multi-bottom plow and disk unit make short work of the multi-acre sized food plot. If the plot is larger and you have access to a tractor with a power take off (PTO) and 3 point hitch you could use a roto-tiller designed for turning the soil just a couple inches below the surface. Rather than using a plow and then disking later, using a roto-tiller makes the soil preparation a one step process.
Agriculture experts recommend against using the roto-tiller method year after year because it tends to damage the soil. I use a 5 foot King Cutter roto-tiller when preparing large seed beds for clover plantings. These plantings are only done every five to six years so the damage to the soil is limited. Another option for larger plots is to use the no-till equipment which does minimal damage to the soil. No-till equipment can be rented from local soil conservation or agriculture organizations.
No matter what tools are used the objective is to achieve good seed to soil contact. The picture below illustrates what the plot should look like prior to planting to achieve that good seed bed. Now you are ready to plant!
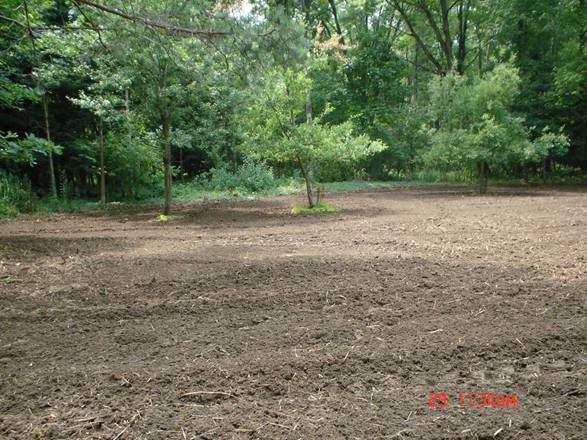
Site after tilling.
Conclusion:
The preparation phase is where the real “lifting” and heavy work is done. Like any foundation work, this is a critical component to your food plot project. By spending the extra time, effort, and sometimes money to amend the soil, clear existing vegetation and prepare a proper seed bed, the resulting food plot will have the best chance for success.
|